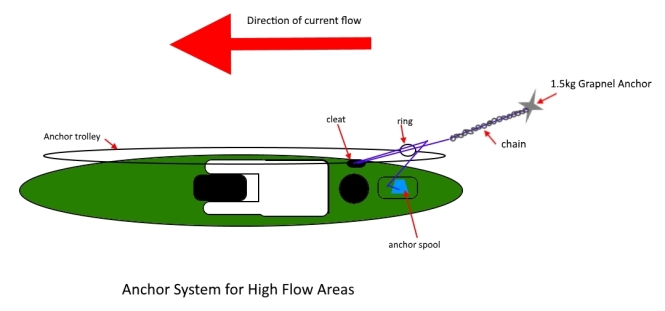
A well set-up anchoring system is a handy piece of kit, allowing you to safely and easily set and retrieve anchors especially in high flow areas. A good anchor trolley has multiple uses and can be used to connect any of the following to your ski:
The anchor trolley is a pretty straight forward piece of kit, essentially a set of pulleys at either end of the kayak, some paracord running between with either end connected to a ring. This allows items to be clipped to, or threaded through the ring to be moved from the front of the kayak to the back. The key with installing the anchor trolley is to have the pulleys installed right at the tips of the kayak. This will ensure that the kayak sits straight in the current when the anchor trolley is sent back rather than swinging/sitting at an angle when the rear pulley is installed too far forward. It is also a good idea to wrap the ring using some of the excess paracord. On glass skis, it helps protect the gelcoat in transit when the wind can make the trolley hit against the side of the kayak. It can also dampen noise when using stakeout poles near easily spooked fish.
Assembling the anchor
Attach one end of the chain to the crown (bottom) of anchor using the D-shackle.
Run the chain along the shank and connect to the eye of the anchor using the cable tie.
Attach the one end of the rope to the end of the chain and the other end should be secured to the hand line spool.
Wind on the rope to the hand line spool and you anchor is ready to go.
Remember that any time you add cords or ropes to your kayak you should carry a safety knife capable of cutting them in the event of entanglement.
Setting and Retrieving your Anchor
The goal is to be able to lift your anchor without having to bring your anchor trolley back to mid-ships. In high flow areas, this will cause your kayak to turn side-on to the current and potentially capsize. Instead, the goal is to set up your anchor system so that it can be released without having to adjust your anchor trolley.
Setting Anchor
It is generally best to take your time and anchor properly rather than rushing it and ending up in the wrong spot. There is nothing worse than dropping anchor and getting ready to set your lines up only to find you have drifted into a channel of off a mark.
Navigate to close to your mark and have a quick drift over it, this will give you a track on your sounder of your drift. (You can do this visually if you don’t have a GPS sounder.
Track back to up-current of your intended mark (the longer the process takes you the further up-current you should start)
Spool out the required line onto your lap. (usually 3 times the depth of water)
Double over the line and pass it through the anchor trolley ring to a cleat – (don’t connect it directly with a carabiner in a high-flow area)
Send you anchor trolley back to the rear of your kayak and
Lower your anchor overboard on the up-current side allowing it to bed in and anchor your kayak.
Take care not to lower you anchor over the down current side of your kayak as this will cause your anchor line to run under your kayak risking a capsize.
Lifting your anchor
Lifting anchor is by far the more dangerous of the two, in terms of capsize potential, especially if you move your anchor trolley away from the back of the kayak towards the amidships, which is the case where people clip anchors directly to the anchor trolley via a carabiner. The goal is to disconnect your anchor from the kayak, spin 180 degrees to face into the current and then wind up your anchor line onto the spool. To achieve this safely, follow the steps below in order.
Grab your anchor spool in your left hand (assuming a starboard side anchor trolley).
Let off enough line from the spool to be able to place your anchor line behind your foot (or a front rod holder) This will create a pivot point for the kayak forward of the centre to help it turn into the current.
Undo the cleat and let the current pull the anchor line out through the trolley ring.
Depress your rudder pedal to turn up current, pull on the anchor spool, keeping the anchor line behind your foot. This will swing your kayak 180 degrees to face into the current.
Gradually wind your line back up onto the spool as the kayak moves forward into the current.
When the anchor line becomes almost vertical the anchor will release and come up.
If the anchor is lodged, give two sharp pulls on the anchor line while keeping your body over the centre line of the kayak. This will break the cable tie and release the anchor backwards.
For fiberglass owners, be careful of the chain and anchor on the way up try not to let it hit the side of your ski. You can add some electrical tape to the anchor line .5m up from the chain as a visual warning.
Pack away the anchor and rope to avoid entanglement in the event of sloppy conditions or an accidental capsize.
Trip Planning – Tides
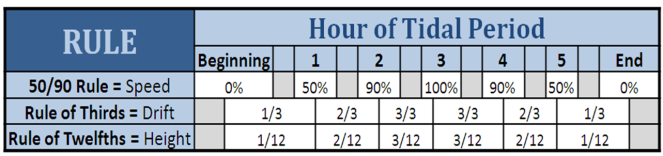
When planning your trip it is best to plan around the tidal flows. You can use the tidal flows to assist you to get to your destination as well as timing your trip so that you are setting and lifting anchor in the safer portion of the tide. The water speed varies throughout the tide and can be approximated by the 50/90 Rule outlined below. The end of the third hour after the tide change is the worst time to be lifting anchor in a high flow area as the tide will be running at maximum strength. This is why it is common for kayakers to fish an area like this one hour each side of the tide changes allowing you to make the most of the tide assistance for your trip. Let’s say your mark was <10km from your launch, you could put in between the third and fourth hour of the run out tide, paddle to your mark and be dropping anchor at the start of the fifth hour as the water is starting to slow down. You could then fish across the tide change and the hour after upping anchor as the water speed is starting to pickup again. You could then use the increasing water to carry you back to your launch spot.
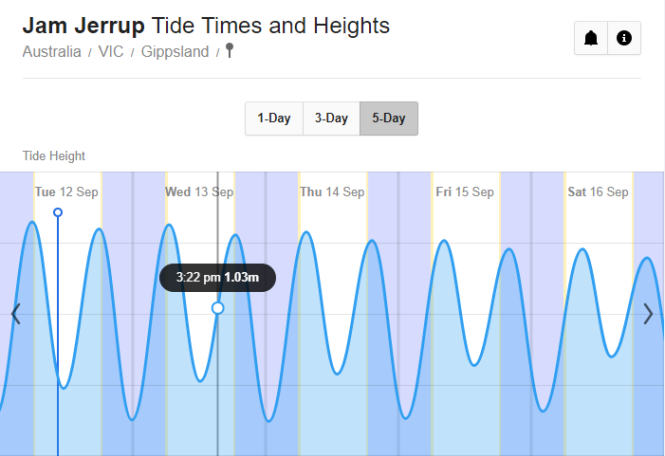
For me this is the best way to fish areas like Lang Lang in Western Port. You can launch at the ramp at Lang Lang with 1m of water left in the tide curve and use the run-out tide to get to Jam Jerrup bluff, fishing across the low tide change, and returning to the ramp on the flood tide. To launch or retrieve at most areas in the top end of Western Port you will need to have at least 1m of water on the tide curve. This is particularly important because over a low tide all of the water will drain out to leave a mud plain, leaving you stranded until the water returns in six hours. In terms of deciding to fish over the high tide or the low tide, the high tide gives the flexibility of being able to come or go as you please but it is harder to pin point the fish. Over a low tide, you are committing to a longer session on the water so it is important to know the weather forecast, and have food, water and sunscreen for the session. The upside is that the fish will retreat to the channels making them easier to find.
They say there is a reason why the footy finishes in September… and in yards all over Victoria, the frustration of teams getting knocked out of finals is taken out on kayaks and boats as winter tarps are lifted and pressure washers are put to good use. Richmond yaks are usually cleaned in August, but this year the dust gathers a little longer…
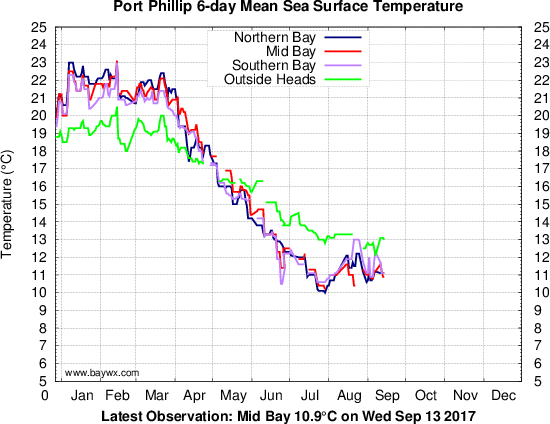
As with most things, every yak fisho will have a preferred technique, bait, lure, spot etc for chasing snapper, and there are plenty more seasoned snapper whisperers out there than myself, but this might give kayak fishos chasing reds for the first time a starting point for the upcoming season. The main run of reds occurs when the waster temperature in the bays reaches parity with the water temperature offshore. This generally occurs in October, but can vary depending on the weather conditions. You can get an updated version of the graph below, here. As you can see, currently the bays are still a little cold so the big influx has not yet occurred and fish being caught this time of year will most likely be fish resident to bay that can be caught right through the winter.
I have two sets of snapper gear – one for each bay, mainly because in Western Port the tides run harder and snapper use them to their advantage but also because in Port Philip Bay I normally use plastics and hard bodies, whereas in Western Port I usually bait fish due to the water clarity in the top end.
Port Phillip (plastics) – 4-6kg Graphite rod, 12lb braid mainline, 2500 to 4000 size reel
Western Port (bait) – 6-10kg Glass rod, 20lb mono mainline, Penn 460 Slammer
You can run braid on your bait set-up too if you like, especially for deeper water as it will lessen the bow in the line up through the water column, but when using braided lines its really important to back your drag off as the fish nears the kayak. If they go for that last ditch run to the deep you can often pull hooks as the braid has no stretch and loose your fish yakside. In the braid vs mono debate, I think braid has a better hook up rate and is my preferred for Port Phillip Bay, for Western Port however I prefer mono because for the fact that most of the places I fish for snapper there have a good chance of a gummy or a big ray as by-catch, both of which will collect all of your lines causing you to bust off leaders on your other braided line. The resultant tangle is also easier to undo with mono, getting your lines back in the water and fishing quicker.
Lures:
Soft Plastics – There are three types of plastics I tend to use on snapper, but I’m sure others will work just as well when there is a hot bite.
Worms – check out Munroe’s caramel eclair or Gulp turtlebacks in camo
Jerk shads – smelt or nuke chicken or motor oil Zman’s are good starting points
Squid types – check out zip- zits if you can find them (hard to get these days), I’ll be checking out the new smash squid this season as a replacement.
In terms of jig heads, go as light as possible to get your plastic to waft down through the bite zone. Snapper are more likely to take it on the drop than dragging along the bottom like a flattie would. Most of the yak spots are not that deep – 15m or less and without much current you can get away with a 1/8 or 1/6 jig head and then match the hook size to the size of the plastic.
Hard Bodies- These range in size and therefore in the size fish they can handle, the Frenzies (after the humble Tassie devil) have to be one of the best bang for buck lures around. They generally attract pinkies rather than monsters, which is just aw well as a monster would chew through one, but are a handy lure to have in the tackle box for trolling on the way out to a mark. I’ve listed the red head below but the silver with red belly models are good too. Make sure you upgrade your hooks on them a) because trebles on a yak hook everything once you bring a fish on board and b) I think singles do a better job of penetrating the hard snapper mouths.
For a heavier fish you’ll probably need to run a slightly larger lure, like a Sebille Koolie Minnow or a classic Rapala taildancer.
Frenzy – QANTAS red head (trebles swapped out for better quality singles)
Koolie Minnow – 76mm in BRB
Rapala Taildancer (~10m of water)
Koolie Minnow
Berkley Redhead
Rigs:
When the snapper enter the bays at the start of the season, they have quite sharp teeth that get worn back as a result of gorging on the shellfish the bays provide. As a result early in the season I tend to run slightly heavier leaders, dropping down as the season progresses. You can also have finicky biters early on so I start the season with thin gauge 4/0 or 5/0 suicide hooks, switching to circles when the season is in full swing in late October and the snapper tend to hit the bait and run. I run a standard running sinker rig in Western Port with and Ezy-rig with a 20- 30cm dropper to the sinker. If you are chasing the bigger models, a twin hook set-up on 30 or 40lb leader will do the job you can match the spacing of the hooks to the size baits you want to use. For Port Phillip Bay however, I try to use the least amount of lead possible if any at all. I use the same two hook rig but instead of the ezi-rig, I just use a small pea sinker running to the hook with a lumo bead to protect the knot or at the top of the bay just some splitshot. This YouTube video by SpedzaGoFishTv outlines how to make a twin hook rig pretty similar to how I do it.
If you are chasing pinkies, then you can use a simple paternoster rig over the shallow reefs, similar to what you would use chasing whiting just a little heavier (~15lb). If you are snagging up a lot you are probably anchored right on the reef. You can anchor just behind the reef edge and draw the fish to you with the berley or try a lighter line class to attach the sinker, which will break in the event of a snag. You could also use an enviroweight attached with an elastic band. Also make sure your anchor has a break-away cable tie fitted, to prevent it getting stuck in the reef, more info here.
Image credit: jazclass
A pair of pan-size pinkies; perfect size for cooking whole.
Baits:
When it comes to bait, you’ll often hear the saying that fresh is best, but sometimes the snapper are just fussy and will take a three time defrosted old pilchard over a fresh squid head, so it’s probably better to say a range is best. I also try to offer up things that are local to the area on the rods if possible and will have frozen stuff as a backup. If I have time in advance I’ll try to do a bait collecting session prior to my trip to give me un-frozen bait. In WP it can be easy to do some bait collecting in the time leading up to the tide change to have fresh baits out at the right time. You can bait up a small hook rig to nab a small salmon to cut up into strip baits. You can also go crab hunting before you launch in some areas. In Port Phillip I try to squid hunt the day before allowing me to save time on the day and get lines and a berley trail going well before the sun comes up. I’ll normally run two or three bait rods on the yak – a combination of pilchard, squid, salmon, crab, pipi or saurie. I used to use banana prawn too but unfortunately outbreaks of white spot disease have now made this unsuitable for use as bait to prevent contamination of our waterways.
Berley:
My berley making is an all year job, which involves having a small bait freezer in the shed. If you are lucky enough to have this set-up you can keep your fish carcasses, off-cuts and old thawed bait in the freezer until you have built up enough stock to make a batch of berley. This ensures nothing goes to waste while helping your catch rate in snapper season.
The first thing you’ll need to do is pick yourself up an old-school meat grinder. You can get them at op-shops or on eBay for not much cash – it is probably best to have one dedicated for the job! To make a berley mix I grind up the carcassases, offcuts and bait that has got freezer burn, or have been thawed and re-frozen too many times. To this I add something that will expand in the water and slow down the berley flow rate. You can use the crushed up Weetbix from the bottom of the box, stale bread, or chook pellets. To finish up add some tuna oil – enough to make the mixture wet enough to mould, but dry enough to stay in a ball once formed. Freeze it down in sandwich bags and you are good to go.
Fishing Spots:
Port Phillip Bay Pinkies – Depending on your level of experience there are plenty of spots in PPB to chase some fish. If you are chasing pinkies, you can get them most of the year at Altona in the West, or Half Moon Bay on the East side. At Altona, the parking is free at Miller’s Rd launch and you only have to paddle a short distance. You can anchor up behind the shallow reef (line up with the Pier and the rock groyne) and use squid or pipi on the paternoster rig. You’ll feed a lot of hungry piranhas to get the size models, but you’ll have lots of fun. Over at Half Moon Bay there are a number of good spots within 2km of launching at Blackrock ramp. The Anonyma Shoal and the 15m contour are within easy paddling distance for suitable bay craft.
Chasing Bigger Reds – The snapper or pinkie debate depends on the angler, for me its fish above the half meter mark qualify as snapper. In Port Phillip Bay, catching bigger fish is about timing. You need to be up early. They raid the reefs under cover and once the sun comes up they move out to deeper waters. If you are launching at first light onto a shallow reef like Altona, you have already missed the boat. I prefer the deeper water off Willamstown or out behind the Cardinal at Altona. Get out on the water at 3am and have your berley trail going and baits in the water long before the sun is thinking of coming up.
In terms of conditions, you can put in lots of hours trying to get your first big red, and while they can be caught randomly in all sorts of conditions, researching the weather will see you spend your time more productively. You’ll hear plenty about barometer readings, wind direction and tides making it hard to know when to go. Obviously, spending more hours on the water will result in more fish, you can’t catch them sitting on the couch, but if you are limited on time here’s what I look for: I reckon the bigger snapper prefer bumpy water so chasing them in PPB you’ll need a kayak and experience suitable for these conditions. I like fishing the day after a big southerly blow as it stirs up the food supply and brings the fish in. Ideally I want a high tide change. If you get a tide change at first light, rising barometer and a southerly the day before that’s when you take a sickie at work! Look for combinations of the above when deciding whether or not to use your leave pass.
Western Port is a bit easier in that the murky waters give snapper more confidence and good fish can be caught throughout the day. In Western Port the tide changes still play an important role in both the fish biting and the conditions you will be fishing in. Try to fish around the tide changes and starting out its best to fish in all-tide launches like Coronet Bay to give an extra margin of safety. Lang Lang and the top end can see some great fish too but you need to know how the tide effects the area to avoid the mud. Its best to fish these areas with someone with local knowledge the first time. Down the bottom of Western Port sees great fish come from the Corals but the tide down here runs hard. You need to understand the 50/90 rule and gain experience anchoring in tide flows to fish these areas. It is also recommended to have quick release anchor setups to avoid getting side-on to current and potentially capsizing.
Spots to try:
Williamstown – Launch from the Angling Club ramp (with permisson) or from the rock circles at the bottom of Coles street and paddle out to the left in front of the footy oval. Sound around for arches before anchoring and setting up your trail.
Altona – Launch from the end of Miller’s Road and paddle out to behind the Cardinal. There will inevitably be boats in the area already so sound around and try to find a spot to yourself. If the fish are on and word is out it will be a carpark but good fish come through the area.
Rickett’s – is probably one of the best known snapper spots in Melbourne and often one of the busiest. Paddle out behind the marine park (marked with buoys or use the Can I fish here? feature of the Vic fishing app if you are not sure)
Lang Lang/Jam Jerrup – Fishing the banks over a high tide is the safest move for beginners, you’ll need at least 1m of water in the tide curve for Jam Jerrup to have enough water to launch and retrieve safely. You can use the tide charts to find out your fishing window, but leave some leeway as they are not always accurate.
Willyweather Tide Curve
You can also fish the forks in the channels over a low as the fish will retreat into the channels as the water drops. You can easily pickup flake as a by-catch through here which isn’t a bad consolation prize!
Coronet Bay – This area is essentially a large grazing ground that all sorts of fish come through. There are no real set ‘marks’ its more a case of paddling out a bit and setting up your offering and settling in to see what comes by. The friendlier water is closer to the launch, the tide rips over at Elizabeth Island and the area between Pelican Island and Snapper Rock is not recommended for beginners – its known as the washing machine for good reason!
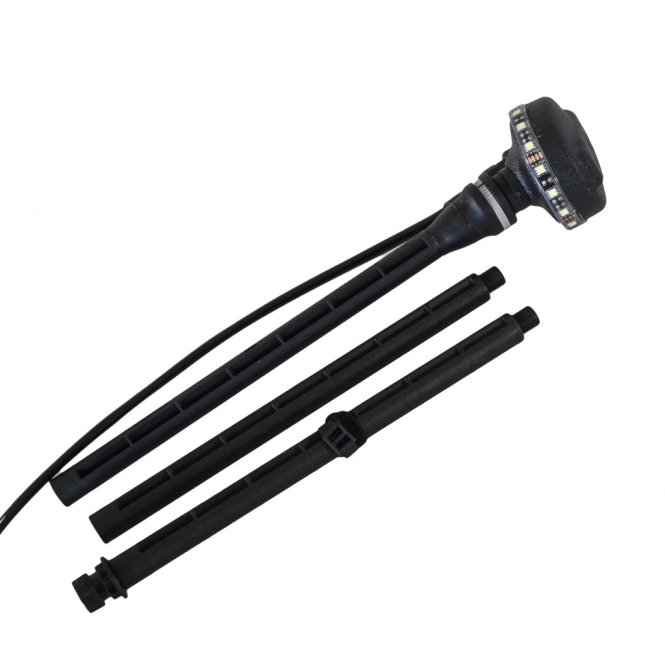
Lighting:
One last thing you’ll need to sort out to chase snapper is a proper light. It is a legal requirement (Under the Colregs) to be able to display a white lantern in sufficient time to prevent an accident when underway in a non-powered vessel. For snapper fishing, it is best to aim for being as visible as possible on the water. A headlight generally won’t cut it. There is a lot more boat traffic on the water this time of year, a portion of which are once-a-year boaters that only fish a couple of trips during snapper season. Another consideration is that kayaks are comparatively, very low to the water and a larger boat up on a plane while moving between spots simply won’t see your kayak but has a chance of seeing a light up higher.
In terms of rigging your light, I’d recommend mounting it behind your seat and high enough to be seen over your head. Keeping the light behind you helps prevent it blinding you and makes it easier to paddle along. You can buy suitable lights lights like the BerleyPro Orb or Railbalza navilight ready made, or if you are handy with a soldering iron, you can make your own using LED strips wrapped around PVC pipe. All will do the job better than none and help stop you becoming a speed bump out on the water!
BerleyPro Orb
I’m sure there is plenty more that could be added, but that’s probably enough to get you started. I’ll add some more photos of my tied rigs during the week.
I tend to fish all months of the year, in order to do this comfortably it is important to be sun smart and immersion smart when considering your choice of clothing. A range of suitable clothing is available from most kayaking stores or online at affordable prices. Unfortunately there is a myriad of options out there making it hard to know where to spend your money, so I’ve put together a collection of some of the options I think are worth considering. The following is just a quick guide of some of the gear I tend to use and not an exhaustive list by any means, but you can follow the links to find stockists and outlets to source the gear for yourself. Contact us if assistance/advice is required.
Summer Clothing
During warmer weather, the more you can cover up, the less sunscreen you have to apply! You should also consider moisture-wicking and drying-times when kayak fishing and as a result do not use any cotton clothing or rash vests as they dry slowly and are cold when wet. Wet suits are great in the water, but out of it they act like a Coolgardie fridge with the wind carrying away your body heat in much the same way as an evaporative cooler does in your home.
Head wear:
There are a couple of options for head wear during summer. You can either go with a hat & buff combo or an all in one flap hat. Buff offer a wide range of face scarves that fit the bill, and an official Buff® buff can be purchased from Technical Headwear or most outdoor sports stores. If you go down the road of an all in one unit, you can get the Adapta-cap from Sun Protection Clothing Australia.
Upper Body:
Up top long sleeves help cover the skin to protect from the elements. This can be in the form of a light thermal such as the 2P Thermo from Adrenalin or a lightweight UPF50 polo from Sun Protection Clothing Australia. In the height of summer a UPF fishing shirt can also fit the bill. Avoid the cotton t-shirts and rashies and on colder days you can layer up with a spray top or cag jacket from Lovig’s or Kokotat.
Lower Body:
On sit-on-top kayaks and skis we don’t have the luxury of leg protection from the deck of our boats so again coverage is key. A pair of lightweight UPF paddling pants or cargo pants can do the trick on warmer days such as those available from SPCA or if there is a breeze about a pair of light thermal pants can do the job nicely again the Adrenalin 2P thermos fit the bill.
Due to sharps on the beach as well as landing on slippery rocks and reefs, some protection for your feet is very important and often overlooked. So pop a pair of old runners on or pick up a pair of dive boots and you are ready to go!
Winter Clothing
Winter can be a little harder with a lot of paddlers opting to put their kayaks away until the sun comes out again. There is plenty of great fishing to be had down south over winter, with monster whiting and squid in Western Port as well as the usual quality flake. There are always some solid flatties available in North PPB until June not to mention trout in the fresh and not forgetting the tuna down at Portland. Water temperatures plummet however and hypothermia is a real threat if you do go for an unplanned swim.
Head Wear:
I normally go for a thermal beanie (polypro not neoprene) to keep the heat in, again Adrenalin have one on offer and I wear my buff and sunnies all year round.
Upper Body
Up top during winter in milder conditions you can again roll out the Adrenalin thermals and if you really feel the cold you can also add merino layers or something heavier like a Lavacore long sleeve. Essentially you are looking for clothing that dries quickly and stays warm even when wet. You can then add a protection layer over the top to keep out the wind and rain. Hoods are a welcome addition on your cag to stop the rain running down your neck and stop the wind whistling in your ears. Check out the Lovig dry top or the kokotat tropos range as suitable outer layers.
A pair of gloves will help keep the circulation in your hands, especially on windy days or after a cold launch in sloppy conditions. I prefer finger-less gloves to allow me to cast easily when fishing. SPCA offer these fingerless gloves in a good range of sizes, you can also get Sea to Summit versions in Anaconda stores. When just out for a paddle a set of pogies are also an excellent option.
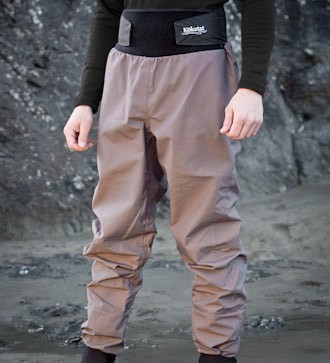
Lower Body:
On my lower half I usually have a pair of thermals (Adrenalin or Lavacore) with a warm pair of socks (merino or thermal not cotton) under a pair of dry pants. Depending on how much you want to spend there are a couple of options out there again both Lovig and Kokotat have good offerings, pants with incorporated socks make winter launches a breeze! Again footwear is a must, not only to protect your feet but also to protect the socks on your drypants from accidental perforation.
The majority of winter gear for kayaking is very much a case of function over fashion so a change of clothes is always a good idea in remote areas in case of an emergency landing where you might require a lift to town. A waterlogged yakker in full garb might have a hard time thumbing a lift!
The main goal is to be able to layer up properly to allow you to fish right through the colder months, after all there is no such thing as a season too cold for kayaking , just the wrong gear for the conditions! Don’t forget to practise deep water re-entries in your new gear as it can often be much harder in full winter gear than in the lighter layers you would wear in the height of summer. Also if you have found more gear worthy of a mention add it in the comments below.
If you are new to kayak fishing, learning how to interpret the wind is an important step in getting out on the bays safely. The question “What is a safe wind speed for a beginner kayaker?” comes up frequently on kayak fishing forums and unfortunately as with most things there isn’t a simple numerical answer because there are many variables to consider; experience, type of kayak, type of fishing intended to name just a few.
Fishing kayaks by nature, particularly those designed for standing and casting tend to have a lot of free-board in their design. This is the distance from the waterline to the lowest portion of the gunwale. This is what helps give these types of kayak a drier ride but the trade off is that they catch more wind and therefore tend to drift faster. While this can be offset for fishing purposes by using a drogue (sea anchor) the extra free-board will also make progress back into the head wind a little harder when you realise you have drifted too far out.
Comfortable and dry, but the trade-off is freeboard.
The answers to the commonly asked questions below will hopefully help you decide whether or not it is worth loading the yak on the roof, and making the trip to the water.
What are the typical easy spots to start out at?
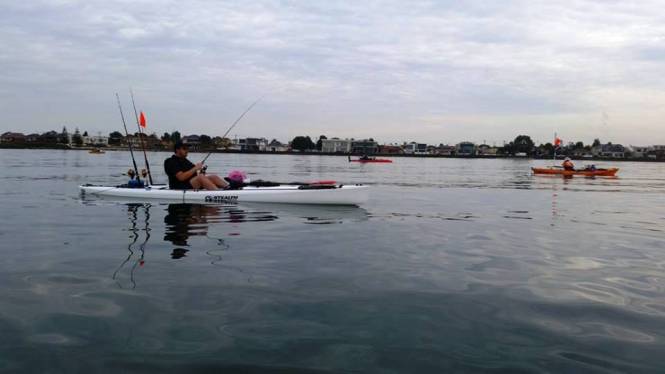
Assuming that you have already spent some sessions on the water without fishing gear getting used to your yak and practising deep water re-entries, there are plenty of beginner friendly spots on both of Melbourne’s bays. Easy launches are the ones with low tide flow on a day with light winds (<10 knots typically). The North of Port Phillip Bay and Reef Island and Coronet Bay areas of Western Port can be considered more beginner friendly spots with all-tide launches and lower tide flows.
Glassed out conditions in the top end of Port Phillip Bay
Where can I get reputable forecast information?
Some may consider it overkill, but my process for checking wind is as follows:
Start with the general forecast for the bay on BOM located here
Then go to BOM Meteye for a more specific wind forecast located here
Finally once at the launch I compare the forecast to the realtime data on Baywinds here
What data points do experienced yakkers look at before they make a decision to go out?
Wind strength
I get the wind speed in knots for the duration of my intended trip and for the hours either side. If you are getting conflicting reports, go with the higher values.
Here is a good kayaking guide to what the water looks like at various wind strengths: http://www.kayarchy.com/html/03thesea/003wind.htm
Consider the conditions along with the type of fishing planned. If you are drifting flicking soft plastics for example, you might be going too fast even with a drogue out. If you are soaking baits at anchor however it might not matter as much provided you can anchor and retrieve safely in wind and you don’t mind a few waves coming in over the back.
Wind direction
Compare the wind direction to a map of your intended launch on Google maps or marine charts if you have them. If the wind is coming onshore (from the water towards land) the bays will have chop ( short sharp wind waves not to be confused with swell) if the wind is offshore (from land out into the bay) then the water will be flatter. Ideally you should aim to find ‘lee’ to fish comfortably. The beauty of the Melbourne’s bays is that for those willing to travel there is always ‘lee’ somewhere! There is another consideration though, while offshore winds flatten out the water, they also blow you away from your launch and you have to paddle/peddle against it to get home. With onshore winds you paddle out against it initially but have a following sea coming back.
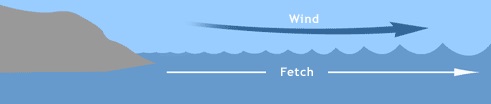
Fetch
Another wind feature to be aware of is ‘fetch’. Fetch is the amount of water the wind has travelled over before getting to you. The longer the fetch length, the more energy the waves will have. For example if you are fishing at St Kilda or Williamstown in a Northerly wind it will have very little fetch but if you fished the same locations in a Southerly the wind will have travelled the length of the bay over water before it gets to you.
Credit: Weatherology
Tides
In areas where the tide flows hard, (bottom of both bays) the direction a tide is going compared to the wind can affect the water. Tide and wind in the same direction is good, tide and wind in opposite directions stands the water up and tide and wind in 90 degrees to each other means you boat will swing at anchor and it is harder to keep your lines where you want them.
Local knowledge of the launch area
Fishing a new spot is probably best done with someone who knows the area, they might not give you their spot X but are very likely to warn you of local hazards; strong tides, exposed reef, bommies etc. If you can’t fish with someone you can learn a lot by visiting the launch spot beforehand at low tide to look for obstacles that are hidden at high tide.
Knowledge of your own equipment
My earlier article on kayak hull design outlines the pro’s and con’s of various fishing kayak hull shapes, but you should also consider the current seaworthiness of your boat. Did you use sealant for any modifications you carried out? Are things like rod holders or sounders going to block or restrict your paddle stroke if you need to get off the water in a hurry? Have you placed accessories in such a way that will impede your ability to re-enter your kayak from deep water.
Safety gear – PFD, bilge pump, spare paddle, torch, beacons
Visibility – lights/flag/compass is there fog forecast?
How do you decide what times to fish between?
It is no secret that tide changes and the hour either side are very productive bite times. In areas like WP where at times you need to travel some distance to your spot and the tide can run hard, it is better to use the tides in your planning e.g. launch and use the outgoing tide to carry you down to your spot, fish across the change and use the incoming tide to carry you back to launch. For some species like snapper, first and last light works well. If you are fishing the top of Western Port over a low tide it will drain to a mud plain leaving deeper water only in the channels. This means you have to stay out on the water until the tide comes back in or you can’t get back to land. Make sure you have sufficient food/water/sun protection for the time you will be out on the water.
When you get to the water what signs do you look for to make a last go/no go decision?
I can’t tell you what conditions are right for you, only you can, but stand and watch the water for a few minutes before you launch, trust your gut feeling when it tells you things are getting hairy. It is better to be onshore wishing you were fishing than offshore wishing you were on land. For me personally, I prefer to paddle into a headwind and see the waves coming at me than have a choppy following sea but I know my boat can handle both if need be. I fish stronger winds at anchor than I would drifting because if the drift is too fast it is usually not productive. If there are consistent whitecaps, how comfortable would you be? Fishing should be enjoyable after all. Also when I want to push myself, I always fish in a group with other experienced people.
When you are on the water, what are the tell tale signs to call it a day or risk getting into a spot of trouble.
Go back to the photos in the Beaufort scale link above, if you notice a change in the water, the wind is picking up, was that expected in the forecast or not? If not, then the forecasters probably got it wrong or a change is coming in earlier than forecast. What way is your boat facing/drifting? Has the wind direction changed? Check for an updated weather forecast on your phone/VHF and make the call to move in closer or head in. Keep an eye on the sky for storm fronts/fog rolling in and lastly when in Rome… If everyone around you is packing up in a hurry and heading in there is probably a good reason why!
With the explosion of choice in the kayak market in recent years, sifting through the options can be a pretty daunting task for new comers to the sport. Here is a quick intro to the basics to help you with the big decision.
A few terms to get your head around first:
Tracking: the ability of a kayak to maintain a straight course while paddling. If a hull tracks badly it zig-zags while you paddle causing a lot of the power from a forward stroke to be lost to side-to side motion.
Freeboard: the height of the side of the kayak measured from the waterline to the deck. Generally kayaks with more free board offer a drier ride, but the trade-off is that there is more of the kayak out of the water to catch the wind. This will increase your drift speed when soft plastic fishing or squidding and will make paddling or pedalling into a headwind that bit harder. To counter the effect of the freeboard, you can use a drogue/sea anchor and Hobie kayaks can also increase their water resistance by keeping fins vertical in the water.
Rocker: the amount of curvature in the keel line of a kayak. Kayaks with large rocker will be seen to have an upturned nose and stern and be banana shaped. They sacrifice a little hull speed but are very responsive and handle surf/chop very well.
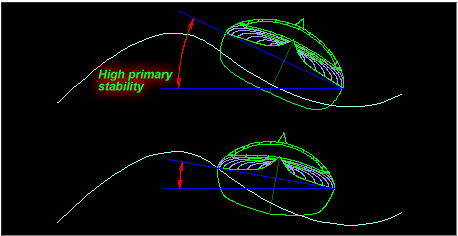
Stability: There are two types of stability, primary & secondary. Primary stability is the initial steadiness a paddler feels when the kayak is on flat water. Secondary stability is a kayak’s ability to stay stable when rolled over on its side. Secondary stability gives the paddler the ability to roll a kayak back upright easily from a tipped over position (think of the no-spill baby cups that roll back up when knocked). Most kayak designs are a balance of primary and secondary stability to suit a particular use. In trying conditions such as choppy swell, secondary stability allows the hull to rotate on the wave keeping you vertical whereas primary wants to stay parallel to the surface of the wave and you have to counter it with your weight, leaning into the swell.
Kayak Design
There are a raft (pun intended) of different sizes and shapes of kayaks out there, the following guide is designed help you match a kayak to your needs. The general perception is that short & wide = stable, long & thin = fast. Unfortunately there is a little more to it than that.
When you hit the stores in search of your first kayak there are four common hull designs features you will encounter. It is very common for modern manufacturers of fishing kayaks to use a blend of these types in their designs. The following diagram and explanation by Austin Kayak sums up these hull features well:
Joseph Dowdy – Austin Kayak
1)Rounded Hulls – These hulls, as their name implies, have rounded edges giving the kayak a ‘torpedo’ shape that results in increased speed because of less water resistance. Rounded hulls usually make for more manoeuvrable kayaks as well and commonly have more secondary than primary stability.
2)V-Shaped Hulls – Compared to rounded hulls, these hulls have a sharper ‘V’ shape that allows the hull to better cut through the water making them more effective at tracking in straight lines. These hulls are generally fast as well and sometimes considered ‘tippy’ as they offer more secondary than primary stability.
3)Flat Hulls – Flat hulls are used for a surprising variety of purposes ranging from play boats to fishing kayaks. The reason is, based on other factors like length, width and curvature, flat hulls combine stability and manoeuvrability. Flat hull also offer great primary stability.
4)Pontoon Hulls – Stability is the key feature of pontoon hulls. Kayaks with these types of hulls combine the primary stability of a flat hull with the secondary stability of a rounded resulting in the the greatest stability available. While these hulls generally lend themselves to decent tracking they aren’t known for their speed.
What other considerations are there?
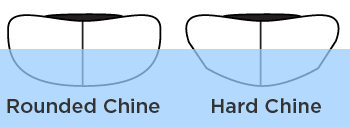
Chines:
The chine of your kayak is the shape of the transition of your kayak from the bottom to the side edge. These transitions can be rounded (also known as a ‘soft’ chine) or square (also known as a ‘hard’ chine). Both types of chine have their advantages and disadvantages.
Joseph Dowdy – Austin Kayak
Hard Chines
Hard chines improve the primary stability of a boat and help with tracking but are more prone to capsize in choppy conditions and in surf launches and landings. The hard chine gives oncoming water more of an edge to push against. Kayaks with hard chines are more prone to broaching in waves. Very common on fishing kayaks particularly those with raised seats and standing areas.
Soft Chines
Soft chines in contrast provide better secondary stability and improved speed. This is ideal for ocean swells and choppier conditions. Soft chines are a common feature on sea kayaks and fishing skis for this reason. Paddlers looking to cover distance will generally go down this road.
Multi-chine
As kayak manufacturers strive to find the perfect balance of primary and secondary stability they often end up producing hulls that are a combination of the four types of hull outlined above. This leads to hulls being multi-chined giving a blend of soft and hard chines and a combination of their features.
Length:
Short Kayaks (~2.5m)
Short kayaks are very manoeuvrable and responsive but tend not to track well and have slower hull speeds. This makes them ideal for fresh water creeks and rivers with skinny water. Their smaller size makes them easy to carry down banks with poor access and their plastic hulls will handle dings from underwater snags/rocks with ease. If chasing natives is your thing then these are probably the boat for you but bear in mind if you are fishing rivers with a bit of flow, its better to organise separate launch and exit points so you are always paddling with the current.
Medium kayaks (~12ft)
This size boat is good for bay and estuary use as they have enough length to track reasonably well and are usually still wide enough to offer good primary stability making them well suited to beginners. The extra length of say a 3.5m boat gives better hull speed which will give you more speed to get off the water quickly if the weather changed out in the bay. The other advantage for bay use is that they will track better into a headwind allowing you to cover more distance to your fishing spot. These boats are ideally suited to fishers who want to drift fishing soft plastics or paddle to a spot to anchor and bait fish. They also tend to offer the best storage for fishing gear.
Long kayaks (~5m)
Boats in this category are usually long and narrow with excellent secondary stability but less primary usually just enough to fish from. Paddlers transitioning to these boats are initially unsettled by the ‘tippyness’ but soon learn to move with the boat. These boats are designed for covering distance so offshore and bay trolling of hard bodies and live baits is where it’s at. They are quite at home in sloppy conditions with a seasoned paddler and generally maintain the best speed into headwinds and current.
Every kayak you buy will be a compromise of places you want to fish and gear you want to carry so it is probably best to buy a boat to match where you want to be fishing 90% of the time and you can’t go too far wrong! I was once told that 95% of the time, the kayak is more capable than the user, which is probably very true, so irrespective of what you end up buying it is a case of trying to up-skill to help put you in the 5%.


 When you get to the water what signs do you look for to make a last go/no go decision?