Interpreting Conditions for Kayak Fishing

If you are new to kayak fishing, learning how to interpret the wind is an important step in getting out on the bays safely. The question “What is a safe wind speed for a beginner kayaker?” comes up frequently on kayak fishing forums and unfortunately as with most things there isn’t a simple numerical answer because there are many variables to consider; experience, type of kayak, type of fishing intended to name just a few.

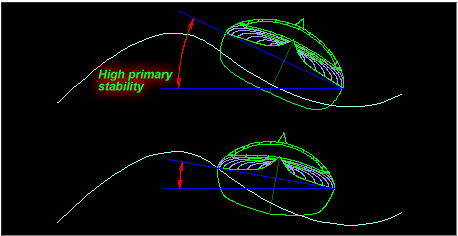
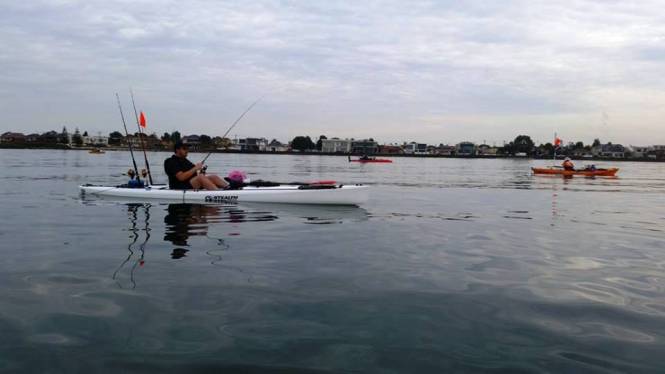
Fishing kayaks by nature, particularly those designed for standing and casting tend to have a lot of free-board in their design. This is the distance from the waterline to the lowest portion of the gunwale. This is what helps give these types of kayak a drier ride but the trade off is that they catch more wind and therefore tend to drift faster. While this can be offset for fishing purposes by using a drogue (sea anchor) the extra free-board will also make progress back into the head wind a little harder when you realise you have drifted too far out.

F1P_2338

Comfortable and dry, but the trade-off is freeboard.

The answers to the commonly asked questions below will hopefully help you decide whether or not it is worth loading the yak on the roof, and making the trip to the water.

What are the typical easy spots to start out at?

Assuming that you have already spent some sessions on the water without fishing gear getting used to your yak and practising deep water re-entries, there are plenty of beginner friendly spots on both of Melbourne’s bays. Easy launches are the ones with low tide flow on a day with light winds (<10 knots typically). The North of Port Phillip Bay and Reef Island and Coronet Bay areas of Western Port can be considered more beginner friendly spots with all-tide launches and lower tide flows.

Altona

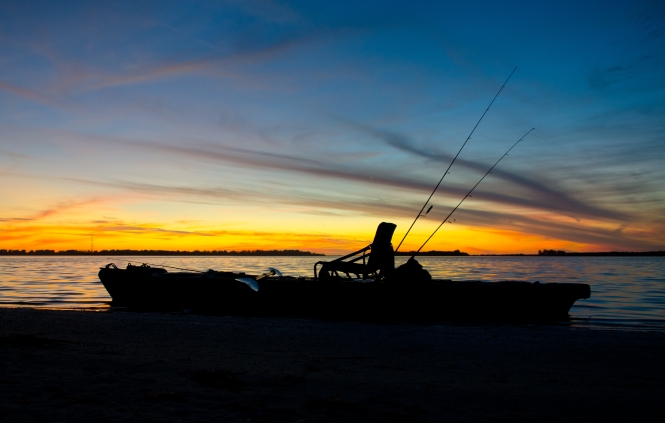
Glassed out conditions in the top end of Port Phillip Bay

Where can I get reputable forecast information?

Some may consider it overkill, but my process for checking wind is as follows:

  1. Start with the general forecast for the bay on BOM located here
  2. Then go to BOM Meteye for a more specific wind forecast located here
  3. I then check the tide curve info on Fish Ranger or WillyWeather
  4. Finally once at the launch I compare the forecast to the realtime data on Baywinds here

What data points do experienced yakkers look at before they make a decision to go out?

Wind strength
I get the wind speed in knots for the duration of my intended trip and for the hours either side. If you are getting conflicting reports, go with the higher values.

Here is a good kayaking guide to what the water looks like at various wind strengths:
http://www.kayarchy.com/html/03thesea/003wind.htm
Consider the conditions along with the type of fishing planned. If you are drifting flicking soft plastics for example, you might be going too fast even with a drogue out. If you are soaking baits at anchor however it might not matter as much provided you can anchor and retrieve safely in wind and you don’t mind a few waves coming in over the back.

Wind direction
Compare the wind direction to a map of your intended launch on Google maps or marine charts if you have them. If the wind is coming onshore (from the water towards land) the bays will have chop ( short sharp wind waves not to be confused with swell) if the wind is offshore (from land out into the bay) then the water will be flatter. Ideally you should aim to find ‘lee’ to fish comfortably. The beauty of the Melbourne’s bays is that for those willing to travel there is always ‘lee’ somewhere! There is another consideration though, while offshore winds flatten out the water, they also blow you away from your launch and you have to paddle/peddle against it to get home. With onshore winds you paddle out against it initially but have a following sea coming back.

Fetch
Another wind feature to be aware of is ‘fetch’. Fetch is the amount of water the wind has travelled over before getting to you. The longer the fetch length, the more energy the waves will  have. For example if you are fishing at St Kilda or Williamstown in a Northerly wind it will have very little fetch but if you fished the same locations in a Southerly the wind will have travelled the length of the bay over water before it gets to you.

Fetch

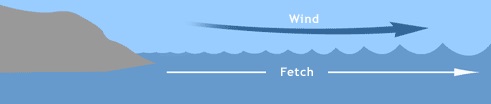
Credit: Weatherology

Tides
In areas where the tide flows hard, (bottom of both bays) the direction a tide is going compared to the wind can affect the water. Tide and wind in the same direction is good, tide and wind in opposite directions stands the water up and tide and wind in 90 degrees to each other means you boat will swing at anchor and it is harder to keep your lines where you want them.

Local knowledge of the launch area
Fishing a new spot is probably best done with someone who knows the area, they might not give you their spot X but are very likely to warn you of local hazards; strong tides, exposed reef, bommies etc. If you can’t fish with someone you can learn a lot by visiting the launch spot beforehand at low tide to look for obstacles that are hidden at high tide.

Knowledge of your own equipment
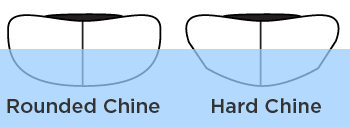
My earlier article on kayak hull design outlines the pro’s and con’s of various fishing kayak hull shapes, but you should also consider the current seaworthiness of your boat. Did you use sealant for any modifications you carried out?  Are things like rod holders or sounders going to block or restrict your paddle stroke if you need to get off the water in a hurry? Have you placed accessories in such a way that will impede your ability to re-enter your kayak from deep water.
Safety gear – PFD, bilge pump, spare paddle, torch, beacons
Visibility – lights/flag/compass is there fog forecast?

How do you decide what times to fish between?

It is no secret that tide changes and the hour either side are very productive bite times. In areas like WP where at times you need to travel some distance to your spot and the tide can run hard, it is better to use the tides in your planning e.g. launch and use the outgoing tide to carry you down to your spot, fish across the change and use the incoming tide to carry you back to launch. For some species like snapper, first and last light works well. If you are fishing the top of Western Port over a low tide it will drain to a mud plain leaving deeper water only in the channels. This means you have to stay out on the water until the tide comes back in or you can’t get back to land. Make sure you have sufficient food/water/sun protection for the time you will be out on the water.

img_2146When you get to the water what signs do you look for to make a last go/no go decision?

I can’t tell you what conditions are right for you, only you can, but stand and watch the water for a few minutes before you launch, trust your gut feeling when it tells you things are getting hairy. It is better to be onshore wishing you were fishing than offshore wishing you were on land. For me personally, I prefer to paddle into a headwind and see the waves coming at me than have a choppy following sea but I know my boat can handle both if need be. I fish stronger winds at anchor than I would drifting because if the drift is too fast it is usually not productive. If there are consistent whitecaps, how comfortable would you be? Fishing should be enjoyable after all. Also when I want to push myself, I always fish in a group with other experienced people.

When you are on the water, what are the tell tale signs to call it a day or risk getting into a spot of trouble.

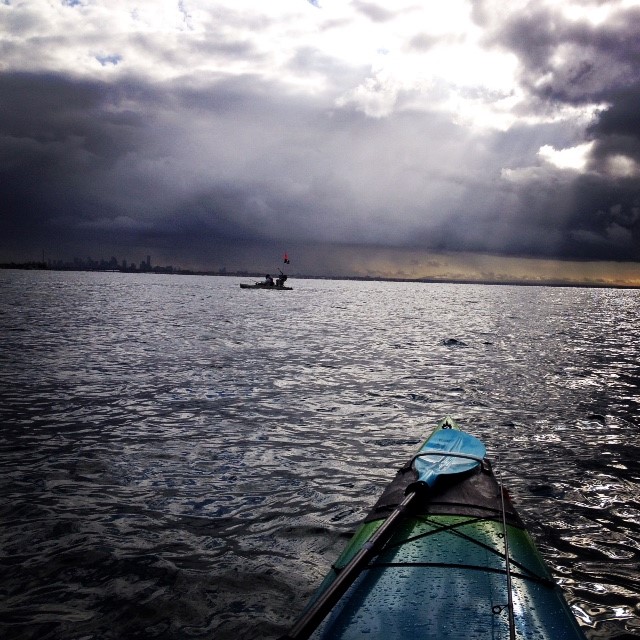
Go back to the photos in the Beaufort scale link above, if you notice a change in the water, the wind is picking up, was that expected in the forecast or not? If not, then the forecasters probably got it wrong or a change is coming in earlier than forecast. What way is your boat facing/drifting? Has the wind direction changed? Check for an updated weather forecast on your phone/VHF and make the call to move in closer or head in. Keep an eye on the sky for storm fronts/fog rolling in and lastly when in Rome… If everyone around you is packing up in a hurry and heading in there is probably a good reason why!

Tight lines

Sea Sherpa

1297050898117

Storm rolling in at Altona. Photo credit: The Age

Easy Chip Shop Style Battered Flake Recipe

Everyone needs a decent batter recipe up their sleeve and after years of playing around with different recipes I’ve settled on this one as my go-to. I normally use this for flake fillets but it can be used with any white fish or even onion rings. Flake will taste better the day after it is caught rather than the day you catch it. If you refrigerate your fillets overnight using a colander over a bowl, it gives the flesh time to sweat out more of the ammonia, improving the eating quality. The trick for crispy batter is to take the time to chill it; cold batter and hot oil gets a crispy end result.

Ingredients:

  • Flake fillets (refrigerated overnight before use)
  • 1 cup of self raising flour
  • Sparkling mineral water (or beer)
  • 2-3 tbs malt vinegar
  • Pinch of salt
  1. Sieve flour and salt together in a bowl.
  2. Make a well in the centre.
  3. Add chilled mineral water/beer and whisk to make a smooth creamy batter.
  4. Add the malt vinegar and stir through.
  5. Cover batter with cling wrap and chill in refrigerator for 30 mins.
  6. Remove flake fillets from the colander and pat dry using kitchen towel.
  7. Coat with a thin layer of flour before dipping in the batter.
  8. Cook in hot oil until golden brown.

Enjoy!

Sea Sherpa

Flake


Kayak hull design explained for first time buyers.

With the explosion of choice in the kayak market in recent years, sifting through the options can be a pretty daunting task for new comers to the sport. Here is a quick intro to the basics to help you with the big decision.

A few terms to get your head around first:

Tracking: the ability of a kayak to maintain a straight course while paddling. If a hull tracks badly it zig-zags while you paddle causing a lot of the power from a forward stroke to be lost to side-to side motion.

Freeboard: the height of the side of the kayak measured from the waterline to the deck. Generally kayaks with more free board offer a drier ride, but the trade-off is that there is more of the kayak out of the water to catch the wind. This will increase your drift speed when soft plastic fishing or squidding and will make paddling or pedalling into a headwind that bit harder. To counter the effect of the freeboard, you can use a drogue/sea anchor and Hobie kayaks can also increase their water resistance by keeping fins vertical in the water.

Rocker: the amount of curvature in the keel line of a kayak. Kayaks with large rocker will be seen to have an upturned nose and stern and be banana shaped. They sacrifice a little hull speed but are very responsive and handle surf/chop very well.

Stability: There are two types of stability, primary & secondary. Primary stability is the initial steadiness a paddler feels when the kayak is on flat water. Secondary stability is a kayak’s ability to stay stable when rolled over on its side. Secondary stability gives the paddler the ability to roll a kayak back upright easily from a tipped over position (think of the no-spill baby cups that roll back up when knocked). Most kayak designs are a balance of primary and secondary stability to suit a particular use. In trying conditions such as choppy swell, secondary stability allows the hull to rotate on the wave keeping you vertical whereas primary wants to stay parallel to the surface of the wave and you have to counter it with your weight, leaning into the swell.

Stability

Kayak Design

There are a raft (pun intended) of different sizes and shapes of kayaks out there, the following guide is designed help you match a kayak to your needs. The general perception is that short & wide = stable, long & thin = fast. Unfortunately there is a little more to it than that.

When you hit the stores in search of your first kayak there are four common hull designs features you will encounter. It is very common for modern manufacturers of fishing kayaks to use a blend of these types in their designs. The following diagram and explanation by Austin Kayak sums up these hull features well:

hull_design

Joseph Dowdy – Austin Kayak

1)Rounded Hulls – These hulls, as their name implies, have rounded edges giving the kayak a ‘torpedo’ shape that results in increased speed because of less water resistance. Rounded hulls usually make for more manoeuvrable kayaks as well and commonly have more secondary than primary stability.

2)V-Shaped Hulls – Compared to rounded hulls, these hulls have a sharper ‘V’ shape that allows the hull to better cut through the water making them more effective at tracking in straight lines. These hulls are generally fast as well and sometimes considered ‘tippy’ as they offer more secondary than primary stability.

3)Flat Hulls – Flat hulls are used for a surprising variety of purposes ranging from play boats to fishing kayaks. The reason is, based on other factors like length, width and curvature, flat hulls combine stability and manoeuvrability. Flat hull also offer great primary stability.

4)Pontoon Hulls – Stability is the key feature of pontoon hulls. Kayaks with these types of hulls combine the primary stability of a flat hull with the secondary stability of a rounded resulting in the the greatest stability available. While these hulls generally lend themselves to decent tracking they aren’t known for their speed.

What other considerations are there?

Chines:

The chine of your kayak is the shape of the transition of your kayak from the bottom to the side edge. These transitions can be rounded (also known as a ‘soft’ chine) or square (also known as a ‘hard’ chine). Both types of chine have their advantages and disadvantages.

chine2

Joseph Dowdy – Austin Kayak

Hard Chines 

Hard chines improve the primary stability of a boat and help with tracking but are more prone to capsize in choppy conditions and in surf launches and landings. The hard chine gives oncoming water more of an edge to push against. Kayaks with hard chines are more prone to broaching in waves. Very common on fishing kayaks particularly those with raised seats and standing areas.

Soft Chines

Soft chines in contrast provide better secondary stability and improved speed. This is ideal for ocean swells and choppier conditions. Soft chines are a common feature on sea kayaks and fishing skis for this reason. Paddlers looking to cover distance will generally go down this road.

Multi-chine

As kayak manufacturers strive to find the perfect balance of primary and secondary stability they often end up producing hulls that are a combination of the four types of hull outlined above. This leads to hulls being multi-chined giving a blend of soft and hard chines and a combination of their features.

Length: 

Short Kayaks (~2.5m)

Short kayaks are very manoeuvrable and responsive but tend not to track well and have slower hull speeds. This makes them ideal for fresh water creeks and rivers with skinny water. Their smaller size makes them easy to carry down banks with poor access and their plastic hulls will handle dings from underwater snags/rocks with ease. If chasing natives is your thing then these are probably the boat for you but bear in mind if you are fishing rivers with a bit of flow, its better to organise separate launch and exit points so you are always paddling with the current.

Medium kayaks (~12ft)

This size boat is good for bay and estuary use as they have enough length to track reasonably well and are usually still wide enough to offer good primary stability making them well suited to beginners. The extra length of say a 3.5m boat gives better hull speed which will give you more speed to get off the water quickly if the weather changed out in the bay. The other advantage for bay use is that they will track better into a headwind allowing you to cover more distance to your fishing spot. These boats are ideally suited to fishers who want to drift fishing soft plastics or paddle to a spot to anchor and bait fish. They also tend to offer the best storage for fishing gear.

Long kayaks (~5m)

Boats in this category are usually long and narrow with excellent secondary stability but less primary usually just enough to fish from. Paddlers transitioning to these boats are initially unsettled by the ‘tippyness’ but soon learn to move with the boat. These boats are designed for covering distance so offshore and bay trolling of hard bodies and live baits is where it’s at. They are quite at home in sloppy conditions with a seasoned paddler and generally maintain the best speed into headwinds and current.

Every kayak you buy will be a compromise of places you want to fish and gear you want to carry so it is probably best to buy a boat to match where you want to be fishing 90% of the time and you can’t go too far wrong! I was once told that 95% of the time, the kayak is more capable than the user, which is probably very true, so irrespective of what you end up buying it is a case of trying to up-skill to help put you in the 5%.

Thanks for reading & tight lines!

Sea Sherpa

Vietnamese Clay-pot Fish Recipe (Ca Kho To)

13524350_259702071066921_3372701520555684773_n


After putting the Fisha 500 to good use up at South West Rocks earlier in the year, I pulled the last of the mackerel out of the freezer and dinner was Ca Kho To, a traditional Vietnamese claypot dish.
Here’s what you need:
1/2 kg mackerel steaks, bone and skin on (Aussie salmon, flake or snapper would work too)
3 tbs brown sugar
2 tbs minced garlic
Couple of twists of black pepper
3 spring onions, sliced 1 inches long
1 chilli
Cooking oil
From the Asian grocery:
4 tbs fish sauce
3 tbs caramel sauce
1 can of coconut juice

Here’s what to look for in the Asian grocery:

Asian grocery ingredients


Method:
1) Marinade steaks with fish sauce, sugar, pepper, garlic, and shallots for about 1/2-1 hr.
2) In pot, heat about 1 tbs of cooking oil on medium high and add the marinaded fish.
3) Allow to sear and brown for about 2-3 before searing opposite side for another few minutes.
4) Add the caramel sauce and just enough coconut juice to the level of the fish steaks. Cover and turn to med low heat and allow to simmer for about 25 min (longer if you want it really soft),
5) Checking a few times to make sure that it’s not reduced too much. Add more coconut juice or caramel sauce if needed. The fish will eventually caramelise and brown, as will the sauce which will be a thick gooey consistency.
6) Taste sauce and make final adjustments with fish sauce or sugar as needed.
7) Turn off heat and add additional fresh cracked pepper, green onions, and chilli.
8) Serve with rice and a cold beer.

Enjoy!

Sea Sherpa

3810970242_382afeac0d