

They say there is a reason why the footy finishes in September… and in yards all over Victoria, the frustration of teams getting knocked out of finals is taken out on kayaks and boats as winter tarps are lifted and pressure washers are put to good use. Richmond yaks are usually cleaned in August, but this year the dust gathers a little longer…
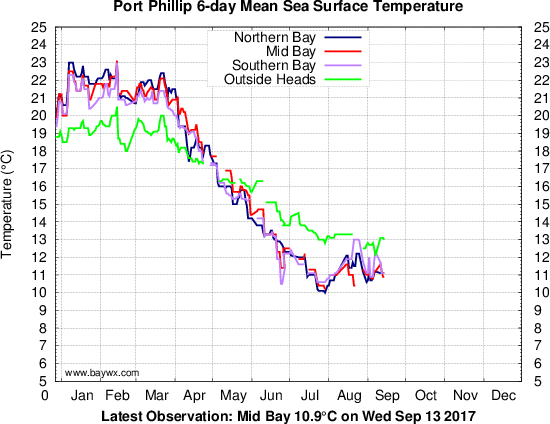
As with most things, every yak fisho will have a preferred technique, bait, lure, spot etc for chasing snapper, and there are plenty more seasoned snapper whisperers out there than myself, but this might give kayak fishos chasing reds for the first time a starting point for the upcoming season. The main run of reds occurs when the waster temperature in the bays reaches parity with the water temperature offshore. This generally occurs in October, but can vary depending on the weather conditions. You can get an updated version of the graph below, here. As you can see, currently the bays are still a little cold so the big influx has not yet occurred and fish being caught this time of year will most likely be fish resident to bay that can be caught right through the winter.
Gearing Up:
I have two sets of snapper gear – one for each bay, mainly because in Western Port the tides run harder and snapper use them to their advantage but also because in Port Philip Bay I normally use plastics and hard bodies, whereas in Western Port I usually bait fish due to the water clarity in the top end.
Port Phillip (plastics) – 4-6kg Graphite rod, 12lb braid mainline, 2500 to 4000 size reel
Western Port (bait) – 6-10kg Glass rod, 20lb mono mainline, Penn 460 Slammer
You can run braid on your bait set-up too if you like, especially for deeper water as it will lessen the bow in the line up through the water column, but when using braided lines its really important to back your drag off as the fish nears the kayak. If they go for that last ditch run to the deep you can often pull hooks as the braid has no stretch and loose your fish yakside. In the braid vs mono debate, I think braid has a better hook up rate and is my preferred for Port Phillip Bay, for Western Port however I prefer mono because for the fact that most of the places I fish for snapper there have a good chance of a gummy or a big ray as by-catch, both of which will collect all of your lines causing you to bust off leaders on your other braided line. The resultant tangle is also easier to undo with mono, getting your lines back in the water and fishing quicker.
Lures:
Soft Plastics – There are three types of plastics I tend to use on snapper, but I’m sure others will work just as well when there is a hot bite.
- Worms – check out Munroe’s caramel eclair or Gulp turtlebacks in camo
- Jerk shads – smelt or nuke chicken or motor oil Zman’s are good starting points
- Squid types – check out zip- zits if you can find them (hard to get these days), I’ll be checking out the new smash squid this season as a replacement.
In terms of jig heads, go as light as possible to get your plastic to waft down through the bite zone. Snapper are more likely to take it on the drop than dragging along the bottom like a flattie would. Most of the yak spots are not that deep – 15m or less and without much current you can get away with a 1/8 or 1/6 jig head and then match the hook size to the size of the plastic.
Hard Bodies- These range in size and therefore in the size fish they can handle, the Frenzies (after the humble Tassie devil) have to be one of the best bang for buck lures around. They generally attract pinkies rather than monsters, which is just aw well as a monster would chew through one, but are a handy lure to have in the tackle box for trolling on the way out to a mark. I’ve listed the red head below but the silver with red belly models are good too. Make sure you upgrade your hooks on them a) because trebles on a yak hook everything once you bring a fish on board and b) I think singles do a better job of penetrating the hard snapper mouths.
For a heavier fish you’ll probably need to run a slightly larger lure, like a Sebille Koolie Minnow or a classic Rapala taildancer.
- Frenzy – QANTAS red head (trebles swapped out for better quality singles)
- Koolie Minnow – 76mm in BRB
- Rapala Taildancer (~10m of water)

Koolie Minnow

Berkley Redhead
Rigs:
When the snapper enter the bays at the start of the season, they have quite sharp teeth that get worn back as a result of gorging on the shellfish the bays provide. As a result early in the season I tend to run slightly heavier leaders, dropping down as the season progresses. You can also have finicky biters early on so I start the season with thin gauge 4/0 or 5/0 suicide hooks, switching to circles when the season is in full swing in late October and the snapper tend to hit the bait and run. I run a standard running sinker rig in Western Port with and Ezy-rig with a 20- 30cm dropper to the sinker. If you are chasing the bigger models, a twin hook set-up on 30 or 40lb leader will do the job you can match the spacing of the hooks to the size baits you want to use. For Port Phillip Bay however, I try to use the least amount of lead possible if any at all. I use the same two hook rig but instead of the ezi-rig, I just use a small pea sinker running to the hook with a lumo bead to protect the knot or at the top of the bay just some splitshot. This YouTube video by SpedzaGoFishTv outlines how to make a twin hook rig pretty similar to how I do it.
If you are chasing pinkies, then you can use a simple paternoster rig over the shallow reefs, similar to what you would use chasing whiting just a little heavier (~15lb). If you are snagging up a lot you are probably anchored right on the reef. You can anchor just behind the reef edge and draw the fish to you with the berley or try a lighter line class to attach the sinker, which will break in the event of a snag. You could also use an enviroweight attached with an elastic band. Also make sure your anchor has a break-away cable tie fitted, to prevent it getting stuck in the reef, more info here.

Image credit: jazclass
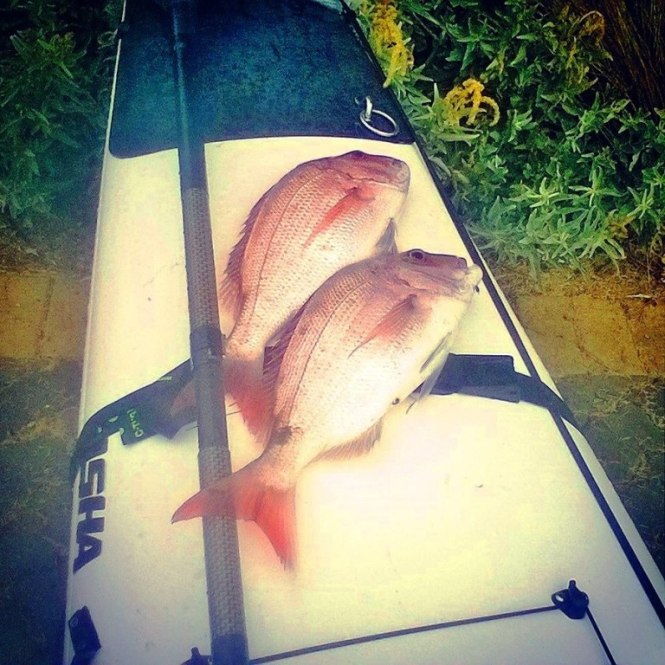
A pair of pan-size pinkies; perfect size for cooking whole.
Baits:
When it comes to bait, you’ll often hear the saying that fresh is best, but sometimes the snapper are just fussy and will take a three time defrosted old pilchard over a fresh squid head, so it’s probably better to say a range is best. I also try to offer up things that are local to the area on the rods if possible and will have frozen stuff as a backup. If I have time in advance I’ll try to do a bait collecting session prior to my trip to give me un-frozen bait. In WP it can be easy to do some bait collecting in the time leading up to the tide change to have fresh baits out at the right time. You can bait up a small hook rig to nab a small salmon to cut up into strip baits. You can also go crab hunting before you launch in some areas. In Port Phillip I try to squid hunt the day before allowing me to save time on the day and get lines and a berley trail going well before the sun comes up. I’ll normally run two or three bait rods on the yak – a combination of pilchard, squid, salmon, crab, pipi or saurie. I used to use banana prawn too but unfortunately outbreaks of white spot disease have now made this unsuitable for use as bait to prevent contamination of our waterways.
Berley:
My berley making is an all year job, which involves having a small bait freezer in the shed. If you are lucky enough to have this set-up you can keep your fish carcasses, off-cuts and old thawed bait in the freezer until you have built up enough stock to make a batch of berley. This ensures nothing goes to waste while helping your catch rate in snapper season.

The first thing you’ll need to do is pick yourself up an old-school meat grinder. You can get them at op-shops or on eBay for not much cash – it is probably best to have one dedicated for the job! To make a berley mix I grind up the carcassases, offcuts and bait that has got freezer burn, or have been thawed and re-frozen too many times. To this I add something that will expand in the water and slow down the berley flow rate. You can use the crushed up Weetbix from the bottom of the box, stale bread, or chook pellets. To finish up add some tuna oil – enough to make the mixture wet enough to mould, but dry enough to stay in a ball once formed. Freeze it down in sandwich bags and you are good to go.
Fishing Spots:
Port Phillip Bay Pinkies – Depending on your level of experience there are plenty of spots in PPB to chase some fish. If you are chasing pinkies, you can get them most of the year at Altona in the West, or Half Moon Bay on the East side. At Altona, the parking is free at Miller’s Rd launch and you only have to paddle a short distance. You can anchor up behind the shallow reef (line up with the Pier and the rock groyne) and use squid or pipi on the paternoster rig. You’ll feed a lot of hungry piranhas to get the size models, but you’ll have lots of fun. Over at Half Moon Bay there are a number of good spots within 2km of launching at Blackrock ramp. The Anonyma Shoal and the 15m contour are within easy paddling distance for suitable bay craft.
Chasing Bigger Reds – The snapper or pinkie debate depends on the angler, for me its fish above the half meter mark qualify as snapper. In Port Phillip Bay, catching bigger fish is about timing. You need to be up early. They raid the reefs under cover and once the sun comes up they move out to deeper waters. If you are launching at first light onto a shallow reef like Altona, you have already missed the boat. I prefer the deeper water off Willamstown or out behind the Cardinal at Altona. Get out on the water at 3am and have your berley trail going and baits in the water long before the sun is thinking of coming up.
In terms of conditions, you can put in lots of hours trying to get your first big red, and while they can be caught randomly in all sorts of conditions, researching the weather will see you spend your time more productively. You’ll hear plenty about barometer readings, wind direction and tides making it hard to know when to go. Obviously, spending more hours on the water will result in more fish, you can’t catch them sitting on the couch, but if you are limited on time here’s what I look for: I reckon the bigger snapper prefer bumpy water so chasing them in PPB you’ll need a kayak and experience suitable for these conditions. I like fishing the day after a big southerly blow as it stirs up the food supply and brings the fish in. Ideally I want a high tide change. If you get a tide change at first light, rising barometer and a southerly the day before that’s when you take a sickie at work! Look for combinations of the above when deciding whether or not to use your leave pass.
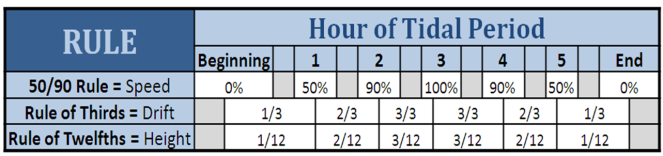
Western Port is a bit easier in that the murky waters give snapper more confidence and good fish can be caught throughout the day. In Western Port the tide changes still play an important role in both the fish biting and the conditions you will be fishing in. Try to fish around the tide changes and starting out its best to fish in all-tide launches like Coronet Bay to give an extra margin of safety. Lang Lang and the top end can see some great fish too but you need to know how the tide effects the area to avoid the mud. Its best to fish these areas with someone with local knowledge the first time. Down the bottom of Western Port sees great fish come from the Corals but the tide down here runs hard. You need to understand the 50/90 rule and gain experience anchoring in tide flows to fish these areas. It is also recommended to have quick release anchor setups to avoid getting side-on to current and potentially capsizing.
Spots to try:
Williamstown – Launch from the Angling Club ramp (with permisson) or from the rock circles at the bottom of Coles street and paddle out to the left in front of the footy oval. Sound around for arches before anchoring and setting up your trail.
Altona – Launch from the end of Miller’s Road and paddle out to behind the Cardinal. There will inevitably be boats in the area already so sound around and try to find a spot to yourself. If the fish are on and word is out it will be a carpark but good fish come through the area.
Rickett’s – is probably one of the best known snapper spots in Melbourne and often one of the busiest. Paddle out behind the marine park (marked with buoys or use the Can I fish here? feature of the Vic fishing app if you are not sure)
Lang Lang/Jam Jerrup – Fishing the banks over a high tide is the safest move for beginners, you’ll need at least 1m of water in the tide curve for Jam Jerrup to have enough water to launch and retrieve safely. You can use the tide charts to find out your fishing window, but leave some leeway as they are not always accurate.
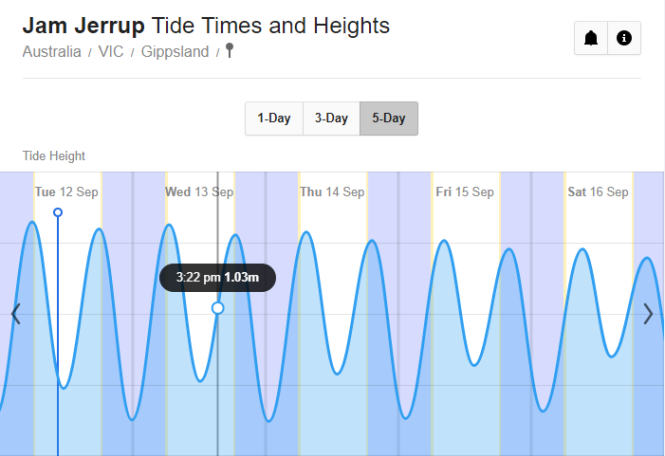
Willyweather Tide Curve
You can also fish the forks in the channels over a low as the fish will retreat into the channels as the water drops. You can easily pickup flake as a by-catch through here which isn’t a bad consolation prize!
Coronet Bay – This area is essentially a large grazing ground that all sorts of fish come through. There are no real set ‘marks’ its more a case of paddling out a bit and setting up your offering and settling in to see what comes by. The friendlier water is closer to the launch, the tide rips over at Elizabeth Island and the area between Pelican Island and Snapper Rock is not recommended for beginners – its known as the washing machine for good reason!
Lighting:
One last thing you’ll need to sort out to chase snapper is a proper light. It is a legal requirement (Under the Colregs) to be able to display a white lantern in sufficient time to prevent an accident when underway in a non-powered vessel. For snapper fishing, it is best to aim for being as visible as possible on the water. A headlight generally won’t cut it. There is a lot more boat traffic on the water this time of year, a portion of which are once-a-year boaters that only fish a couple of trips during snapper season. Another consideration is that kayaks are comparatively, very low to the water and a larger boat up on a plane while moving between spots simply won’t see your kayak but has a chance of seeing a light up higher.
In terms of rigging your light, I’d recommend mounting it behind your seat and high enough to be seen over your head. Keeping the light behind you helps prevent it blinding you and makes it easier to paddle along. You can buy suitable lights lights like the BerleyPro Orb or Railbalza navilight ready made, or if you are handy with a soldering iron, you can make your own using LED strips wrapped around PVC pipe. All will do the job better than none and help stop you becoming a speed bump out on the water!
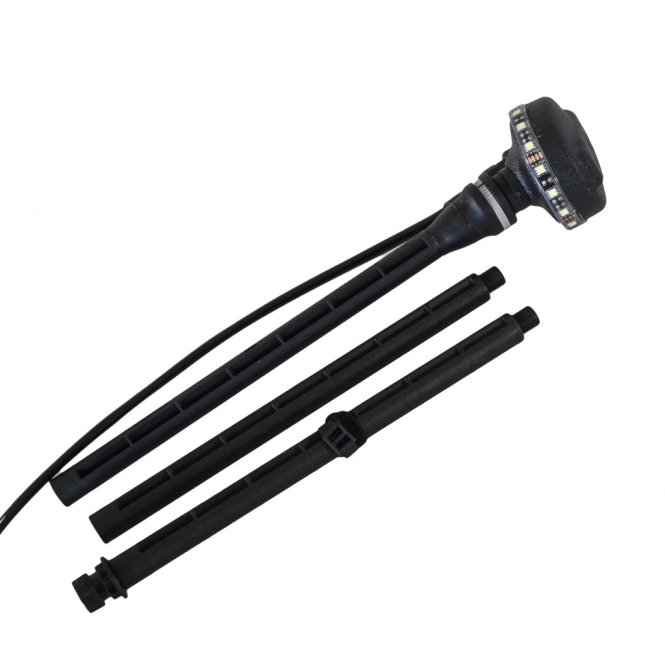
BerleyPro Orb
I’m sure there is plenty more that could be added, but that’s probably enough to get you started. I’ll add some more photos of my tied rigs during the week.
Tight lines!
Sea Sherpa
