

A well set-up anchoring system is a handy piece of kit, allowing you to safely and easily set and retrieve anchors especially in high flow areas. A good anchor trolley has multiple uses and can be used to connect any of the following to your ski:
- Anchor
- Drogue
- Live bait tube
- Stake-out pole


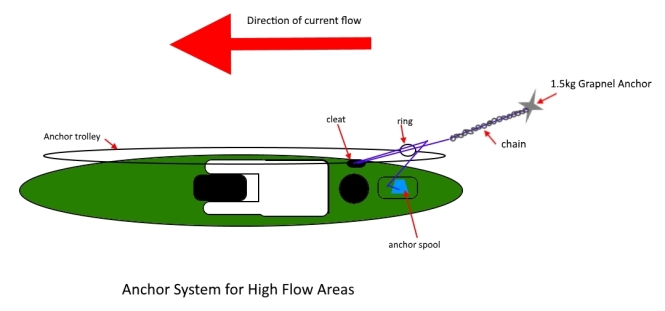
Basic Anchor System Components
- 12m of paracord (a little over double the length of your kayak).
- 2 stainless pulleys and a means of fixing them to the kayak (padeyes or similar).
- Stainless steel or nylon ring
- Cleat
- Hand line spool with about 30m of 4mm cord,
- 1m of chain,
- 1.5kg grapnel anchor (2.5kg for very high flow areas)
- D-shackle
- Cable tie
Installing Your Anchor Trolley
The anchor trolley is a pretty straight forward piece of kit, essentially a set of pulleys at either end of the kayak, some paracord running between with either end connected to a ring. This allows items to be clipped to, or threaded through the ring to be moved from the front of the kayak to the back. The key with installing the anchor trolley is to have the pulleys installed right at the tips of the kayak. This will ensure that the kayak sits straight in the current when the anchor trolley is sent back rather than swinging/sitting at an angle when the rear pulley is installed too far forward. It is also a good idea to wrap the ring using some of the excess paracord. On glass skis, it helps protect the gelcoat in transit when the wind can make the trolley hit against the side of the kayak. It can also dampen noise when using stakeout poles near easily spooked fish.
Assembling the anchor

- Attach one end of the chain to the crown (bottom) of anchor using the D-shackle.
- Run the chain along the shank and connect to the eye of the anchor using the cable tie.
- Attach the one end of the rope to the end of the chain and the other end should be secured to the hand line spool.
- Wind on the rope to the hand line spool and you anchor is ready to go.
- Remember that any time you add cords or ropes to your kayak you should carry a safety knife capable of cutting them in the event of entanglement.
Setting and Retrieving your Anchor
The goal is to be able to lift your anchor without having to bring your anchor trolley back to mid-ships. In high flow areas, this will cause your kayak to turn side-on to the current and potentially capsize. Instead, the goal is to set up your anchor system so that it can be released without having to adjust your anchor trolley.
Setting Anchor
- It is generally best to take your time and anchor properly rather than rushing it and ending up in the wrong spot. There is nothing worse than dropping anchor and getting ready to set your lines up only to find you have drifted into a channel of off a mark.
- Navigate to close to your mark and have a quick drift over it, this will give you a track on your sounder of your drift. (You can do this visually if you don’t have a GPS sounder.
- Track back to up-current of your intended mark (the longer the process takes you the further up-current you should start)
- Spool out the required line onto your lap. (usually 3 times the depth of water)
- Double over the line and pass it through the anchor trolley ring to a cleat – (don’t connect it directly with a carabiner in a high-flow area)
- Send you anchor trolley back to the rear of your kayak and
- Lower your anchor overboard on the up-current side allowing it to bed in and anchor your kayak.
- Take care not to lower you anchor over the down current side of your kayak as this will cause your anchor line to run under your kayak risking a capsize.
Lifting your anchor
Lifting anchor is by far the more dangerous of the two, in terms of capsize potential, especially if you move your anchor trolley away from the back of the kayak towards the amidships, which is the case where people clip anchors directly to the anchor trolley via a carabiner. The goal is to disconnect your anchor from the kayak, spin 180 degrees to face into the current and then wind up your anchor line onto the spool. To achieve this safely, follow the steps below in order.
- Grab your anchor spool in your left hand (assuming a starboard side anchor trolley).
- Let off enough line from the spool to be able to place your anchor line behind your foot (or a front rod holder) This will create a pivot point for the kayak forward of the centre to help it turn into the current.
- Undo the cleat and let the current pull the anchor line out through the trolley ring.
- Depress your rudder pedal to turn up current, pull on the anchor spool, keeping the anchor line behind your foot. This will swing your kayak 180 degrees to face into the current.
- Gradually wind your line back up onto the spool as the kayak moves forward into the current.
- When the anchor line becomes almost vertical the anchor will release and come up.
- If the anchor is lodged, give two sharp pulls on the anchor line while keeping your body over the centre line of the kayak. This will break the cable tie and release the anchor backwards.
- For fiberglass owners, be careful of the chain and anchor on the way up try not to let it hit the side of your ski. You can add some electrical tape to the anchor line .5m up from the chain as a visual warning.
- Pack away the anchor and rope to avoid entanglement in the event of sloppy conditions or an accidental capsize.
Trip Planning – Tides
When planning your trip it is best to plan around the tidal flows. You can use the tidal flows to assist you to get to your destination as well as timing your trip so that you are setting and lifting anchor in the safer portion of the tide. The water speed varies throughout the tide and can be approximated by the 50/90 Rule outlined below. The end of the third hour after the tide change is the worst time to be lifting anchor in a high flow area as the tide will be running at maximum strength. This is why it is common for kayakers to fish an area like this one hour each side of the tide changes allowing you to make the most of the tide assistance for your trip. Let’s say your mark was <10km from your launch, you could put in between the third and fourth hour of the run out tide, paddle to your mark and be dropping anchor at the start of the fifth hour as the water is starting to slow down. You could then fish across the tide change and the hour after upping anchor as the water speed is starting to pickup again. You could then use the increasing water to carry you back to your launch spot.

For me this is the best way to fish areas like Lang Lang in Western Port. You can launch at the ramp at Lang Lang with 1m of water left in the tide curve and use the run-out tide to get to Jam Jerrup bluff, fishing across the low tide change, and returning to the ramp on the flood tide. To launch or retrieve at most areas in the top end of Western Port you will need to have at least 1m of water on the tide curve. This is particularly important because over a low tide all of the water will drain out to leave a mud plain, leaving you stranded until the water returns in six hours. In terms of deciding to fish over the high tide or the low tide, the high tide gives the flexibility of being able to come or go as you please but it is harder to pin point the fish. Over a low tide, you are committing to a longer session on the water so it is important to know the weather forecast, and have food, water and sunscreen for the session. The upside is that the fish will retreat to the channels making them easier to find.
Tight Lines,
Sea Sherpa
